

There is a particular kind of picture that looks as though it has been sent upstairs. Below it sits a perfectly good sofa. Between them is an expanse of wall large enough for another small exhibition.
This usually happens for sensible reasons. Someone centres the picture on the wall, follows an old nail or stands close to it while holding it up. The arrangement seems fine until everyone sits down.
Art does not have to obey one hanging height throughout a home. A picture encountered on a staircase has a different relationship with you from one above a low sideboard. The first decision is what the picture belongs to. The tape measure comes next.
Choose the relationship before the height
Above a sofa, consider the seating group and the view from the opposite chair. Above a console, think about the console, lamp and picture together. On an otherwise empty wall, the picture may stand alone, with its position judged from the route people take through the room.
This is why a universal ‘eye level’ instruction eventually fails. Whose eyes, standing where? A sensible starting position still needs testing in the actual room. Charles & Hudson distinguishes art above furniture from art on a clear wall, and recommends checking the arrangement before making holes. See its hanging guide.
Measure the furniture you are associating with the art, not automatically the whole wall. If a sofa sits off-centre because of a doorway, centring a picture on the wall can make the sofa look accidentally misplaced. Centre on the sofa first, then test an intentional asymmetry if a lamp or adjacent opening makes that more convincing.
Make the paper version earn its keep
Cut a paper template to the outside dimensions of the frame. Mark the centre and note the artwork’s main visual weight, especially if most of its colour is concentrated at one end. A blank rectangle tells you about size; it cannot tell you everything about the picture itself.
Position the template with a wall-safe method suitable for your finish. Then leave the immediate area. Look from the doorway, sit in the usual chair and check the view from an adjoining room. Take one photograph straight on rather than at a flattering angle. That often reveals a picture floating too high or a pair squeezed into an awkward gap.
Test two positions, not twenty. Start near enough to the furniture to read as a group, leaving space for heads, objects and everyday use. Move the template higher or lower by a noticeable amount and compare. Repeated tiny adjustments are an excellent way to spend an afternoon without making a decision.

A hanging-height calculation that includes the hanger
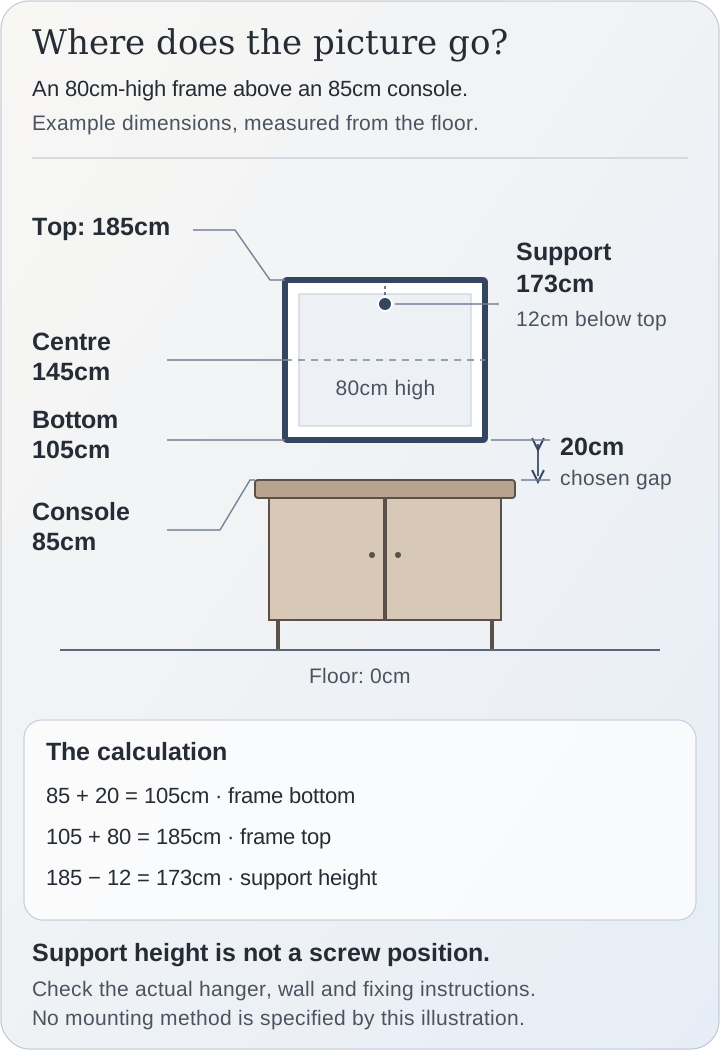
Take a console 85cm high and a framed picture 80cm high. For this example, the template looks right with a 20cm gap above the console. That puts the bottom of the frame at 105cm, its top at 185cm and its centre at 145cm from the floor. These are example choices, not required dimensions for every console.
Now inspect the back. If the actual load-bearing point of the hanger sits 12cm below the top of the frame, the corresponding support point on the wall needs to be at 173cm: 185 minus 12. Marking 185cm for the hook would put the entire picture too high.
For a wire, the relevant distance is measured with the wire in the position it will take when supported, following the frame maker’s instructions. For two D-rings or another two-point system, measure both fixing positions and their spacing individually. The wall fastening and the point that supports the frame may not be the same mark. Check the hardware drawing before drilling.
When two smaller pictures are better than one enormous one
A wide sofa does not oblige you to buy a vast canvas. A pair or a closely related group can occupy the same stretch of wall while allowing you to keep smaller works you love. Treat the outside boundary of the group as your first shape, then arrange the individual pictures within it.
For a pair of 40cm-wide frames with an 8cm gap, the total width is 88cm. Put that whole outline on the wall before deciding that each picture is too small. Beside a tall lamp, you may want to shift the group slightly away from the shade rather than centre every object independently.
With an irregular collection, choose one organising line: perhaps two lower edges, a shared centre or a clear vertical edge beside a doorway. The remaining pieces can vary. If every frame is floating at a different height with a different gap, the viewer has to work hard to understand the arrangement. A modest amount of order leaves room for the art to be varied.
Let the furniture continue doing its job
Leave room for the console lamp, but do not arrange everything around a vase that only comes out at Christmas. Check a cabinet’s opening lid and the route of doors nearby. Behind a sofa, sit back as you normally would to make sure a frame is not in the path of someone’s head.
A reflective picture can look wonderful from the doorway and show nothing but a bright window from the chair. Test the real framed work in position with help before fixing it permanently. Moving it to a different wall can be more successful than trying to overcome the reflection with another light.
Finally, match the fixing to the frame, its weight and the wall construction. Follow the maker’s instructions or use a competent installer when those details are uncertain. Adhesive systems have specific restrictions: for example, Command’s picture-strip instructions exclude hanging over beds, on wallpaper and hanging valuable or irreplaceable items. The instructions for the exact product take priority. Command guidance.
Once the picture is safely up, look at it from where you actually live. If it works from the sofa, the dining chair and the doorway, it has passed a more useful test than matching an old nail.
Art to plan around
Measure the selected size and frame before placing the paper template.
Shop images show retailer photographs or Room Study styling illustrations, identified on each selection. These are suggestions for the decisions discussed, not a claim that every piece appears in the room.

USEditorial selectionRetailer photograph
Composition No. 11 Velvet Geometry
Big Wall Decor
The strong blocks of colour are legible across a room. Compare the actual framed dimensions of the option you select with your furniture.
US Shop listing. Size and frame options vary at the retailer.

UKEditorial selectionRetailer photograph
Lotus print, A0
The Roost
The large floral print offers an alternative to an abstract composition. Allow for the outside dimensions of the frame you choose.
A0 print listing; check whether framing is included.
Check the selected size, finish and retailer’s care or installation instructions. We may earn commission through retailer links in the Shop. Affiliate disclosure.
Keep reading
Sources and further reading
Explore more

I’ll just check on the potatoes
At Christmas, a trip to the kitchen can be an excellent excuse for five minutes to yourself. A welcoming house should offer somewhere to pause without requiring a household chore.

We were only going to play one round
Games tables are back in the interiors pages. There is something rather appealing about a room that gives us a reason to stay a little longer.